

Intro
This blog post kicks out the series of use cases that can be used to monitor user management on Windows platform. Most of the blue teamers know that unexpected changes in local users and their privileges serve as a huge red flag for the secops. Considering dangers of the local administrative privileges, part 1 of the series will be about tracking creation of the local users accounts on Windows endpoints.
As a pre-requisite you should get logs from the endpoints, for example via Windows Events Forwarding or any other means you have.
ISO 27001 Controls Supported
| A.9.2 User Access Management | |
|---|---|
| A.9.2.1 | User registration and de-registration |
Base Preparations for the ArcSight ESM
By default Windows logs that are parsed by the standard ArcSight SmartConnector of the WinC type miss out on some fields that are important for this use case. We need to correct this behavior. In ArcSight ESM go to the Connectors tab and right click the connector that collects logs from the endpoints. Choose Send Command -> Mapping -> Get Additional Data Names and you should get a response with various fields. We are going to map certain field that otherwise do not appear in the logs by default, to be specific the TargetSid under the Vendor/product [Microsoft\Microsoft_Windows] section.
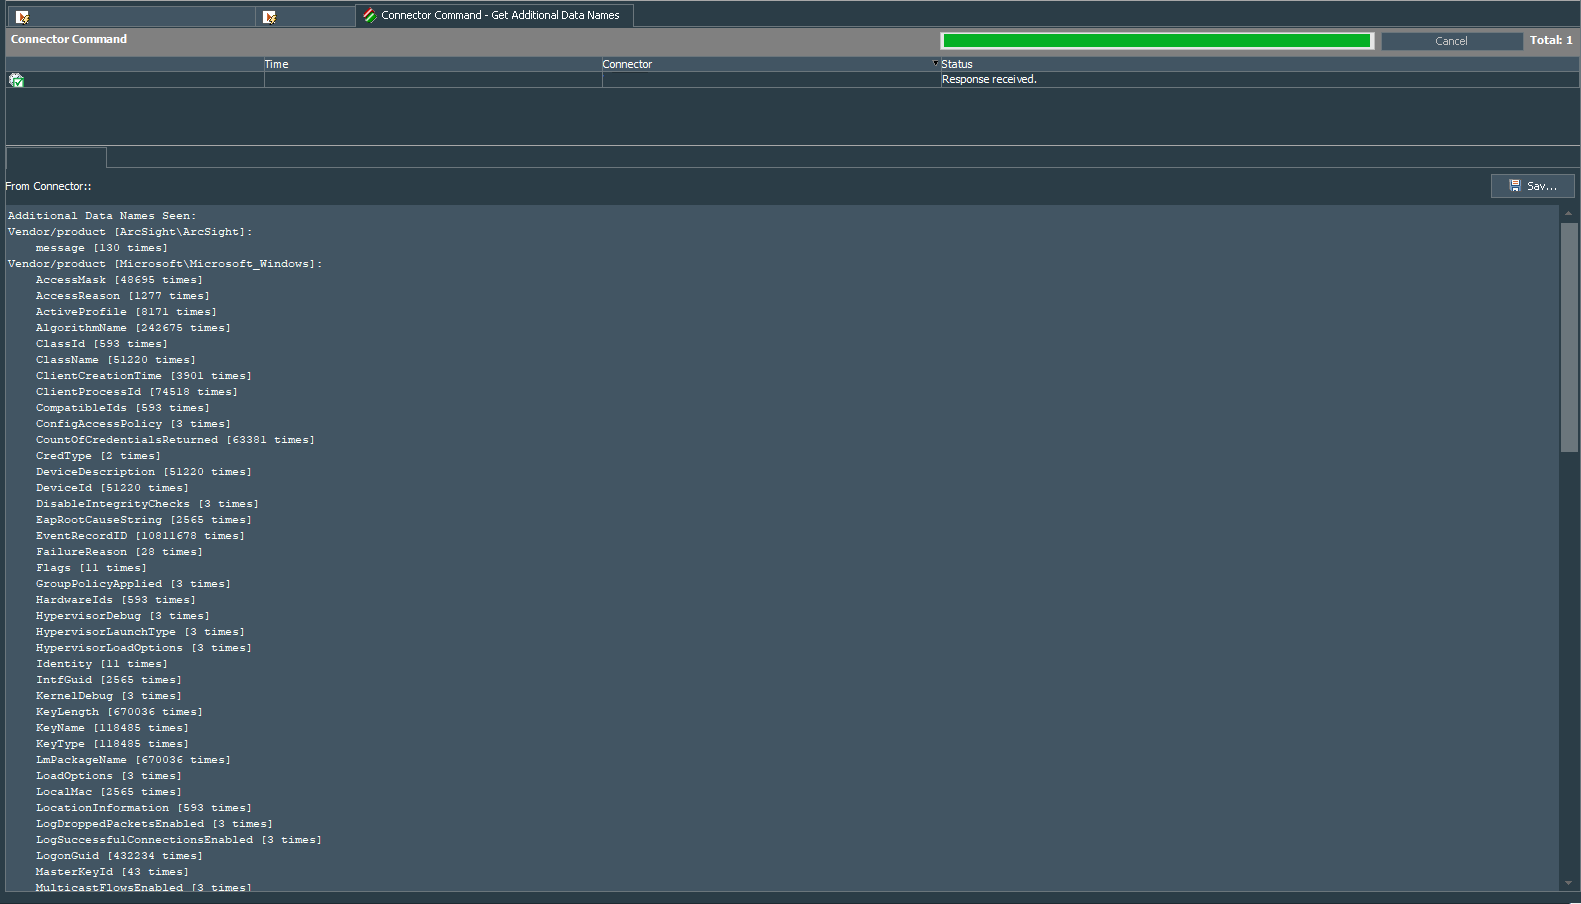
Note: these are the fields that appear in the ArcSight Logger with the prefix ad.
To map the TargetSid to the deviceCustomString1 field, choose Send Command -> Mapping -> Map Additional Data Names and fill it as follows:
| Device vendor | Microsoft |
| Device product | Microsoft Windows (Please note that you should enter it without "_" character) |
| Additional data name | TargetSid |
| ArcSight field | deviceCustomString1 |
Do not forget to press Ok.

You should get a response of the successful mapping.

Next we need to setup notifications in the ArcSight ESM
Select Notifications from the Navigator. Right click on All Destinations and create a New Group, for example SOC Operators. Next right click the group you have just created and Add Escalation Level. Finally right click the escalation level that was just created (probably called Level 1) and create New Destination, give it a name, choose appropriate Start Time and End Time or leave them as default. Select Destination Type as Email Address and provide the email address in the Email Address field. Leave the rest as default and press OK.
We also need to create the Active List, called Local accounts SIDs. It should be case sensitive, with enough row capacity (depends on number of the endpoints you monitor and number of the local user accounts you expect to be regularly created), set the indefinite time for the TTL Days, Hours or Minutes. This active list should be the fields-based type with the key field enabled:
| Active List Field Name | Field Type | Key-Field |
|---|---|---|
| SID | String | Y |
| User Name | String | N |
Base Filters
As usual let’s start with some base filters, they are all narrowed down by excluding the machine generated events, correlation events and Active Directory events.
Make sure that you add correct names of your Domain Controllers in the filter as fields targetHostName != domain controller host name.
The first one is called Windows Events - Local user account creation attempt, which will catch events 4720. That filter will catch events related to all the successful attempts of the user account creation.
Summary of the filter below:
event1 :  (
Agent Type = winc
AND
Category Behavior = /Authentication/Add
AND
Category Object StartsWith /Host
AND
Category Outcome = /Success
AND
Type != Correlation
AND
Device Product = Microsoft Windows
AND
Target Host Name != [Domain Controller Host Name]
AND
External ID = 4720
AND
Attacker User Name Is NOT NULL
AND
Attacker User Name NOT EndsWith $
AND
Attacker User Name != SYSTEM
AND
Attacker User Name NOT StartsWith NT AUTHORITY
AND
Attacker User Name != ANONYMOUS LOGON
AND
Attacker User Name != NETWORK SERVICE
)

The second filter, deals with the successful account enable events. Call it Windows Events - Local user account enabled. This filter catches events 4722, showing that user account was enabled.
Summary of the filter below:
event1 :  (
Agent Type = winc
AND
Type != Correlation
AND
Category Behavior = /Authorization/Add
AND
Category Object StartsWith /Host
AND
Category Outcome = /Success
AND
Device Product = Microsoft Windows
AND
Target Host Name != [Domain Controller Host Name]
AND
External ID = 4722
AND
Attacker User Name Is NOT NULL
AND
Attacker User Name NOT EndsWith $
AND
Attacker User Name != SYSTEM
AND
Attacker User Name NOT StartsWith NT AUTHORITY
AND
Attacker User Name != ANONYMOUS LOGON
AND
Attacker User Name != NETWORK SERVICE
AND
Target User Name NOT EndsWith $
AND
Target User Name Is NOT NULL
AND
Target User Name != SYSTEM
AND
Target User Name NOT StartsWith NT AUTHORITY
AND
Target User Name != ANONYMOUS LOGON
AND
Target User Name != NETWORK SERVICE
)

The third base filter, called Windows Events - Local user account added to local group, catches events 4732 to show that user account has been added to a local group.
Summary of the filter below:
event1 :  (
Agent Type = winc
AND
Type != Correlation
AND
Category Behavior = /Authorization/Add
AND
Category Object StartsWith /Host
AND
Category Outcome = /Success
AND
Device Product = Microsoft Windows
AND
Target Host Name != [Domain Controller Host Name]
AND
External ID = 4732
AND
Attacker User Name Is NOT NULL
AND
Attacker User Name NOT EndsWith $
AND
Attacker User Name != SYSTEM
AND
Attacker User Name NOT StartsWith NT AUTHORITY
AND
Attacker User Name != ANONYMOUS LOGON
AND
Attacker User Name != NETWORK SERVICE
AND
Target User Name NOT EndsWith $
AND
Target User Name Is NOT NULL
AND
Target User Name != SYSTEM
AND
Target User Name NOT StartsWith NT AUTHORITY
AND
Target User Name != ANONYMOUS LOGON
AND
Target User Name != NETWORK SERVICE
)

Correlation rule authoring
Now that we have three base filters, let’s start authoring the correlation rule based on the events caught by the above three filters. I called my rule Windows Events - Local User Account Created Manually. This is a standard rule.
First I have created three named Event Definitions, called: creation_attempt, account_enabled, added_to_group. Each of these event definitions has condition to match filter respectively: Windows Events - Local user account creation attempt, Windows Events - Local user account enabled, Windows Events - Local user account added to local group. Next we should create Matching Event that matches all (AND operator) of the following Joint Conditions within 5 second (this time frame should be based on your environment performance and assumption that local accounts can be created by the script):
| Left Field | Operator | Right Field |
|---|---|---|
| creation_attempt.Target User Name | = | account_enabled.Target User Name |
| creation_attempt.Target Address | = | account_enabled.Target Address |
| creation_attempt.Device Address | = | account_enabled.Device Address |
| creation_attempt.Attacker User Name | = | account_enabled.Attacker User Name |
| added_to_group.Device Address | = | creation_attempt.Device Address |
| added_to_group.Attacker User Name | = | creation_attempt.Attacker User Name |
| added_to_group.Target User Name | = | creation_attempt.Device Custom String1 |
Summary of the rule conditions looks like this:
Matching Event (Matching within 5s):  (
creation_attempt.Target User Name = account_enabled.Target User Name
AND
creation_attempt.Target Address = account_enabled.Target Address
AND
creation_attempt.Device Address = account_enabled.Device Address
AND
creation_attempt.Attacker User Name = account_enabled.Attacker User Name
AND
added_to_group.Attacker User Name = creation_attempt.Attacker User Name
AND
added_to_group.Device Address = creation_attempt.Device Address
AND
added_to_group.Target User Name = creation_attempt.Device Custom String1
)   creation_attempt :
MatchesFilter("Windows Events - Local user account creation attempt")
  account_enabled :
MatchesFilter("Windows Events - Local user account enabled")
  added_to_group :
MatchesFilter("Windows Events - Local user account added to local group")

Let’s create a local account on the endpoint to understand the logic behind this correlation. When you create a local user manually, you can notice that three events are generated by the OS, those that we catch with our base filters. Basically, local user being automatically enabled and placed in the default Users group after account creation. Events #4720 and #4722 in your logging system will have destination username exactly as defined during the account creation, while the event #4732 has destination username as account’s SID. Beside those three events, three more are generated. These are event #4738, that show changes done to the account created. For the demonstration purposes I created a local user called ash_test_user, check the logs from the ArcSight ESM in the screenshot below:

An interesting observation: when creating accounts manually with the selected Account is disabled option, system will still generate events #4720, #4722, #4732 #4738, but one of the #4738 events will show that account is disabled. It seems as if an account is created with the enabled status and immediately modified to the disabled state by the OS after its creation. Below is the screenshot of the events for the comparison, I have highlighted the difference as it appears in the logs.

After finalizing our conditions, we move to defining local variables. The first one is the alias to the Device Custom String1, called sid, the second is the string function ToLower for the Target User Name, called usertolower, the final one is the alias to the Target Address, called hostaddress. These local variables will help us sending the notifications over email and linking SIDs to specific local user accounts.

Proceed to the Aggregation tab and define aggregation conditions as follows:
Aggregate if at least 1 matching conditions are found within 5 Seconds
AND these event fields are the same (creation_attempt.Target Host
Name, account_enabled.Target Zone Resource, creation_attempt.sid,
account_enabled.Destination Nt Domain, account_enabled.Attacker Zone
Resource, added_to_group.Target User Name, account_enabled.Device Zone
Resource, account_enabled.Attacker Address, creation_attempt.Destination
Nt Domain, account_enabled.Attacker User Name, account_enabled.Target
User Name, creation_attempt.Attacker User Name, creation_attempt.Target
User Name, creation_attempt.Target Zone Resource, account_enabled.Device
Event Class ID, account_enabled.Target Host Name, added_to_group.hostaddress,
creation_attempt.Device Address, creation_attempt.Device Zone Resource,
account_enabled.Device Address, creation_attempt.Device Event Class ID,
account_enabled.usertolower, creation_attempt.Target Address,
account_enabled.Target Address)
Finally we can move on to the rule Actions tab. I use On every event to set the fields as fileId=$sid and flexString1=localusercreated, as well as send notification with required acknowledgment to the group you have defined in the Notifications menu. In my case the group is related to the SOC and its first level destination is the email address. So we define rule as Send Notification, select proper group we want send notification to and set the Notification Message as Local user [$usertolower] has been created on the [$hostaddress], make sure to uncheck Ack Required tickbox.

Finally I define Add to Active List action on every event as follows:
| ESM Event Field / Local Variable | Active List Field Name | Field Type | Key-Field |
|---|---|---|---|
| sid | SID | String | Y |
| usertolower | User Name | String | N |
This might not always work, but it is quick’n’dirty way to link SIDs to local usernames. The value of the $sid local variable is equal to the value of the deviceCustomString1 field of the event #4720, while the value of the $usertolower local variable is equal to the value of the Target User Name field of the event #4722. We achieve that by properly setting Aggregation conditions.

After finishing with the rule actions we can save the changes. If you receive warning about adding additional fields to the Aggregation conditions, press No and proceed with the saving.

Test the rule and deploy it for the real-time processing.
Custom email notification template
You may wonder why did we assign value localusercreated to the flexString1 field. This is done to be able to send the email notification with the custom template.For more details and customization thoughts, please read the following blog post. It is absolutely brilliant. My custom email template that I use for this specific notification looks like this:
-----------------------------------------------------------------
USER ACCOUNT HAS BEEN CREATED ON THE ENDPOINT
-----------------------------------------------------------------
Event Time:                $introspector.getDisplayValue($event,"endTime")
Endpoint IP Address:       $introspector.getDisplayValue($event,"targetAddress")
Endpoint Host Name:        $introspector.getDisplayValue($event,"targetHostName")
Target NT Domain:          $introspector.getDisplayValue($event,"targetNtDomain")
Endpoint Zone:             $introspector.getDisplayValue($event,"targetZoneName")

-----------------------------------------------------------------
Event Details
-----------------------------------------------------------------
A new user has been created and enabled on the Endpoint.

Account created by:        $introspector.getDisplayValue($event,"attackerUserName")
Account Name:              $introspector.getDisplayValue($event,"targetUserName")
Account SID (pls. verify): $introspector.getDisplayValue($event,"fileId")

-----------------------------------------------------------------
Why this is Important
-----------------------------------------------------------------
Creation of local user accounts  may be indication of the admi-
nistrative privileges abuse.

-----------------------------------------------------------------
Next Steps
-----------------------------------------------------------------
Please verify if the created user account is legitimate.

In case of the unauthorized changes send an email: [email protected]
Mentions
Photo by Gabriel Crismariu on Unsplash
