

Intro
In one of my previous posts I went on a bit of a rambling about how bad the standard ArSight’s PowerShell Exchange connector is. Recently I have found out that it does not always pulling all the admin audit events. I was checking and comparing the logs pulled directly from the Exchange server by the PowerShell script against those pulled by the ArcSight’s standard connector. The final score was 10 log entries with PS script against only 2 (yes, you have read it right) pulled by the connector. Sure this behavior is not always the case but still WTF, right?
To continue with my quest of getting meaningful logs from the Exchange into the ArcSight I have decided to work on the custom flex connector, that potentially would do its job a bit better than the standard one. Problem was that I had no idea how to develop a flex connector.
As the saying goes: “A journey of thousand miles begins with a single step”, so we begin.
Pre-requisites
The flex connector will be of the Regex Folder File type.
Ensure that you have user name and password to access the Exchange Server and read audit logs.
On the server where you plan to install FlexConnector create a local user that will be used to run the scheduled task. It should be normal user with the Logon as a batch job privileges assigned. In order to assign this privileges, run secpol.msc, navigate to the Security Settings ->Local Policies->User Rights Assignment, double click Log on as a batch job and add the local user created.

Create a folder PSscript on the C drive. Assign Read & Execute, List folder contents, Read privileges for the local account created earlier. This folder shall be used to store our scripts and other related files.
Next, if you do not have it already, create a folder Temp on the C drive . In Temp folder create another called exchsaul. Assign Modify, Read & Execute, List folder contents, Read, Write privileges to these two folders for the same user name. These two folder shall be used to export the output of the script as well as the running debug logs.
Download the parsing PS script from here and save it under the simplelog.ps1 name to the PSscript folder.
PowerShell Script
We first start with the creation of custom PowerShell script that will run every 30 minutes as a scheduled task, extract the Admin Audit Logs, pass them to the parsing PS script and output the results into the delimited text based log file.
The custom script itself is based on the one I used for my PoC with some modifications. We do not need to parse any parameters to the script, so most of those are gone and only the required remain. To run custom script we must have an account that has access rights to read the Exchange audit logs and a password to it. As security folks we know that storing password in clear text is a no-go, so let’s convert our password to something less obvious.
PowerShell has a technique that allows you to obfuscate a password. Obfuscation is not going to prevent a skilled attacker from finding a way to reuse it, however, in our case what we are trying to achieve is not to disclose password in clear text to multiple parties.
To simply obfuscate a password you can use the following command: "P@ssword1" | ConvertTo-SecureString -AsPlainText -Force | ConvertFrom-SecureString, where you replace
P@ssword1 with the actual password.
The result would look something like this:

But this will not allow you to reuse the script on multiple machines, as the obfuscation operation would have to be performed under every user name and host name that you will use to run the script. TTo achieve it we need to use an encryption key.
Run PowerShell_ISE as administrator. Create a new script and paste the following code:
$Key = New-Object Byte[] 32
[Security.Cryptography.RNGCryptoServiceProvider]::Create().GetBytes($Key)
$Key | out-file C:\PSscript\aes.key
Run it to create a file called aes.key in the C:\PSscript folder.
Next, in the PowerShell console run the following command "P@ssword1" | ConvertFrom-SecureString -key (get-content C:\PSscript\aes.key) | set-content "C:\PSscript\pwd.txt", again replacing the P@ssword1 with the actual password. This will generate the obfuscated password and export it to the pwd.txt file.
For the sake of this post I will work with all the files in one directory, but in the production environment you should move the key to some separate folder and assign proper access rights to it.
If you would like to get more familiar with the password handling techniques please read the following link and this one as well.
My final version of the custom script looks like this:
###############################################################################
#Version 1.0
#Author: ASh
#Modifier: ASh
#
#Purpose: To extract the details of the event from Exchange audit log.
#
#Prerequisites: Access to the exchange server
#
#Example:
#C:\Windows\System32\WindowsPowerShell\v1.0>powershell -FILE c:\PSscript\exchSAUL.ps1
#
#Known Bugs:
#
#Changes:
#
################################################################################

#Treat all errors as terminating
$ErrorActionPreference = "Stop"

#Input parameters
$strFQDN="[FDQN NAME OF THE SERVER]" # name of the Exchange server
$strUSER="[NAME OF THE ACCOUNT]" # name of the account for connecting to the Exchange server
$PasswordFile = "C:\PSscript\pwd.txt" #location of the encoded password
$KeyFile = "C:\PSscript\AES.key" #location of the key for the encoding

Try
{
#Create a log file in the C:\Temp folder to show that script run and its parameters
$LogFileName = "C:\Temp\exchSAUL-LOG-$(Get-Date -Format 'yyMMdd-HHmmss').log"
"Starting Log at $(get-date)" | Out-File -FilePath $LogFileName -Append

#Construct URL based on the FQDN of exchange server
$strURL="http://"+$strFQDN+"/PowerShell/"

##
#Create a new remote session against the exchange server and import it to local.
#Example: $Session = New-PSSession -ConfigurationName Microsoft.Exchange -ConnectionUri http://[FDQN of THE EXCHNAGE SERVER]/PowerShell/ -Authentication Kerberos

#import key file contents and create a credential object with password file contents
$key = Get-Content $KeyFile
$cred = New-Object -TypeName System.Management.Automation.PSCredential -ArgumentList $strUSER, (Get-Content $PasswordFile | ConvertTo-SecureString -Key $key)

#Create New Session connecting to the Exchange Server.
$Session = New-PSSession -ConfigurationName Microsoft.Exchange -ConnectionUri $strURL -Authentication Kerberos -Credential $cred -AllowRedirection
Import-PSSession $Session -AllowClobber -DisableNameChecking | out-file -filepath $LogFileName -Append # last part is to redirect message to the log file.

#Updating the log file name with the session ID:
"$(get-date) : PS Session ID: $Session" | Out-File -FilePath $LogFileName -Append # writing to the log file ID of the powershell session created

}

# This will catch errors if any record them to the log file.
Catch
{
    $ErrorMessage = $_ | Out-String
    "Error Detected at $(get-date): $ErrorMessage" | Out-File -FilePath $LogFileName -Append
}


Try
{
#Setting the parameters of the -StartDate & -EndDate
$endDate = Get-Date -Format "MM/dd/yyyy HH:mm:ss" # Setting the -EndDate as of the time script runs
$endDateMod=[datetime]$endDate # convert string to DateTime type variable
$startDateMod=$endDateMod.AddMinutes(-30) # Setting the start date earlier than -EndTime. Number should correspond to the task running period.
$startDate=[datetime]::ParseExact($startDateMod, "MM/dd/yyyy HH:mm:ss",$null).ToString("MM/dd/yyyy HH:mm:ss") # Convert DateTime to the string type variable.

# Uncomment below  to view the output of the dates variables for some debugging

# $StartDate
# $startDateMod
# $EndDate
# $endDateMod


#Here we actually extract the logs from the audit logs pass to another script (simplelogs.ps1) and filter output by
#the specific timing. Make sure that you use correct paths to the script.

$output=Search-AdminAuditLog -StartDate $startdate -EndDate $enddate -ResultSize 10000 | C:\PSscript\simplelog.ps1 -agree

# sending the output to the console. Uncomment for the testing or running the script as a stand-alone
$output

if ($output -ne $null)
{
# sending the output to the csv
$SAULFileName = "C:\temp\exchsaul\exchSAUL-$([datetime]::ParseExact($endDateMod, "MM/dd/yyyy HH:mm:ss",$null).ToString("yyMMdd-HHmmss")).csv"
$output | ConvertTo-Csv -NoTypeInformation -Delimiter "|" | Select-Object -Skip 1 | Set-Content -Path $SAULFileName -Encoding UTF8 # this line will export output to csv without header in the UTF8
# writing the output to the log.
"Received output at the $(get-date)" | Out-File -FilePath $LogFileName -Append
$output | out-file -filepath $LogFileName -Append
}
else
{
"$(get-date) : No entries found" | Out-File -FilePath $LogFileName -Append # writing to the log file that output is null
}
}

Catch
{
    $ErrorMessage = $_ | Out-String
    "Error Detected at $(get-date): $ErrorMessage" | Out-File -FilePath $LogFileName -Append
}


Try{
Remove-PSSession $Session #This will clear the created session, otherwise there may be trouble of openning to many connections to the server.
"$(get-date) : Closed PS Session ID: $Session" | Out-File -FilePath $LogFileName -Append # writing to the log file ID of the powershell session closed
}

Catch
{
    $ErrorMessage = $_ | Out-String
    "Error Detected at $(get-date): $ErrorMessage" | Out-File -FilePath $LogFileName -Append
}

"Closing Log $(get-date)" | Out-File -FilePath $LogFileName -Append # closing the log.
As usual I have tried to comment the script. Copy it and save it and save it as exchSAUL.ps1 to the PSscript folder
Note: Make sure to input correct FDQN of the server and username to access that server in the beginning of the script as $strFQDN and $strUSER variables.
Now generate some test admin events in the Exchange and run our custom script in the PowerShell ISE to check if it works as intended. The script extracts the data for the last 30 minutes. If everything is correct the actual events will appear as a CSV file in the C:\TEMP\exchsaul folder. The debug logs and related runtime information will appear in the C:\Temp folder as a separate file.
Scheduled Task
We need to create scheduled task to run the script every 30 minutes.
Run the Task Scheduler

Right click on the Task Scheduler Library and select Create Task

Give the task a name and chose the local username that you have created earlier as part of the pre-requisites to run the script. Make sure to select Run whether user is logged on or not

In the Triggers create one to run the script daily every half hour.

Under the Actions define the command to execute the script as powershell.exe and -File C:\PSscript\exchSAUL.ps1 as arguments.

Save the task and let it run for sometime to observe its operation. Once confirmed that it runs without glitches, you can proceed to installation and configuration of the FlexConnector.
Flex Connector Installation and Configuration
Download the latest distributive for the ArcSight Connectors. For our purpose we need to install in on the Windows server. Proceed to install Core Software. Read how to do it on the page 31 of the FlexConnector Developer’s Guide
Note: Link to the guide might change, so just Google it.
When it comes to add a connector we will go with the Regex Folder File. This connector according to the guide is to:
read events in real time, one line at a time, from a log file.However, some devices may not write to log files in real time. To read such events, use a Regex Folder Follower FlexConnector. This connector processes all log files in a specified folder.
So proceed to Add a Connector and choose ArcSight FlexConnector Regex Folder File and click Next.

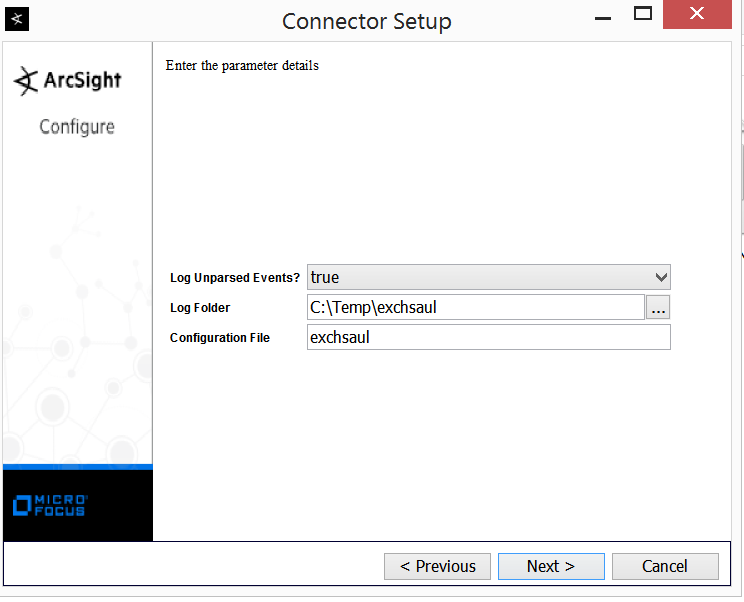
For the Parameter Details provide C:\Temp\exchsaul as the Log Folder and exchsaul as the configuration file name, and press Next.
You will get the error that configuration file does not exist, just press Yes to continue with the installation.

For the destination I initially choose CEF file, in order to prevent junk from getting into the production environment. I add the actual Logger or ESM destinations only after confirming the proper functioning and parsing of the events.

Rest of the settings are pretty straight forward. If you are not familiar with the whole installation process I would recommend reading SmartConnector User Guide before installing the connector.
After our installation is finished we should start working on the configuration file. The structure of the file as well as its purpose for the regex folder file connector type is described on the page 65 onwards of the FlexConnector Developer’s Guide.
If you recall we have named our configuration file as exchsaul. For a connector with the variable-format output, the suffix .sdkrfilereader.properties should be used. In our case the file name becomes $ARCSIGHT_HOME\user\agent\flexagent\exchsaul.sdkfilereader.properties
Note: $ARCSIGHT_HOME is the name of the folder where connector is installed including current folder.
You can create configuration file for the regex file folder with the special toolkit provided by the FlexConnector. To do this open cmd as administrator, navigate to the folder where you have installed your connector: cd $ARCSIGHT_HOME\bin\ and run arcsight regex. To understand how to use it please watch this YouTube tutorial
My configuration file looks like this:
# FlexAgent Regex Configuration File
do.unparsed.events=true

regex=^.*"(.*)"\\|"(.*)"\\|"(.*)"\\|"(.*)"\\|"(.*)"$

token.count=5

token[0].name=sourceUser
token[0].type=String

token[1].name=cmdletName
token[1].type=String

token[2].name=fullCommand
token[2].type=String

token[3].name=eventTime
token[3].type=String

token[4].name=destinationUser
token[4].type=String

event.deviceEventClassId=__stringConstant("Admin Audit Log")
event.deviceVendor=__getVendor("Microsoft")
event.deviceProduct=__stringConstant("Microsoft Exchange 2016")
event.deviceCustomString2Label=__stringConstant("Event Time")
event.deviceCustomString2=eventTime
event.deviceCustomString1Label=__stringConstant("Full Command")
event.deviceCustomString1=fullCommand
event.destinationUserName=destinationUser
event.name=cmdletName
event.sourceUserName=sourceUser
Note: Usually I use https://regex101.com/ to create and test the expressions. Just remember that in parsers and configuration files
\symbol should be properly escaped.
One interesting “bug” of the output produced by the custom PowerShell script was a weird invisible character inserted at the beginning of the first line. None of the online regex testers could notice it. I found out about it by loading the output into the Regex Tool of the FlexConnector Toolkit.
I have set Device Vendor as Microsoft and Device Product set as Microsoft Exchange 2016, you can use whatever version you use.
Categorizer
As you may know the content in ArcSight ESM relies on the categorization of events to a certain extent. Categorization is like a semantic information that can be used to correlate events.
Categorizer files are stored under the `$ARCSIGHT_HOME\user\agent\aup\acp\categorizer\current directory. Under that directory, we need to create a directory that matches the deviceVendor field of the events we are categorizing, and under that we should create a map file named for the deviceProduct field of the events with the .csv extension.
Folder and file names should be normalized in the following matter:
- Any upper case letters should be converted to lowercase.
- Any characters that are not letters or digits should be converted to underscore characters.
In my case the full path becomes $ARCSIGHT_HOME\user\agent\aup\acp\categorizer\current\microsoft\microsoft_exchange_2016.csv
Read more about categorizer on the page 165 and then 221 of the FlexConnector Developer’s Guide
My categorizer is quite simple with the only one getter.
event.deviceEventClassId,set.event.categoryObject,set.event.categoryBehavior,set.event.categoryOutcome,set.event.categorySignificance,set.event.categoryDeviceGroup,set.event.categoryDeviceType
Admin Audit Log,/Host/Application/Service/Email,/Modify,/Success,/Informational/Warning,/Application,/Mail
Final Steps.
OK, so to recap:
- Save the script that will extract logs from Exchange server and download the one from the Microsoft site to parse those logs.
- Create the required local user name, assign it proper privileges to run the scheduled task
- Ensure that you have another user name to access Exchange Logs.
- Create a required set of folders, assign proper permission rights for the local user to access them.
- Create scheduled task to run the script and make sure that it runs the script and produces the results as intended.
- Install the FlexConnector core software.
- Prepare the configuration and categorizer files for the FlexConnector.
We are ready to start the connector as a stand alone. To do this run the command as administrator on the server where the connector is installed: $ARCSIGHT_HOME\bin\arcsight agents
Check that the connector processes output log files that our script saves to the C:\Temp\exchsaul folder and parses those logs to the CEF file as destination in a proper manner.
As the standard settings it will rename every parsed file to add the .processed extension to the file.
If everything works, proceed to modify connector settings running as a service.
The connector running as a service should have a standard setting of Log on as: Local System account.
And we are done.
